Overview
Styles
Styles can help you to quickly set a layout for your page, they can include the colours, fonts, and general feel of the document.References
Referencing in documents can be difficult, which is why tools have been created to make your life so much easier. This includes referencing external documents as well as resources within the file.Images
Word often struggles with large documents with lots of images. These tips can help you mitigate these problems, as well as helping with page layouts.File Size
A Word file size can often spiral out of control. What can be done about it?
Styles

The Style Toolbar in Word 2010
The Styles Toolbar is part of the Home tab on the Ribbon. The majority of the the toolbar is taken up by the 'Quick Format' styles, used for changing the text. This is one of the most powerful ways to quickly produce a well-formatted document: you can very quickly assign your titles to a specific size, allowing a consistent feel to be carried through the whole document and (most usefully perhaps) allowing you to insert a table of contents automatically:

A Table of Contents can be automatically inserted with proper formatting if the Text Styles have been used
Once you have your document written with properly styled headings, you can utterly change the feel of your document by applying a Style Set. These are found in the Change Styles menu. Try playing around with the different sets to find something you like.

A Style Set can be used to completely modify the whole page design. Also shown here are the menus for Colour and Font
A more advanced technique is to right-click a heading type in the Quick Styles bar and modify the style yourself. This can make your document unique and interesting.
Another way to make your document unique is to change the Colors set, of the Fonts set. The use of font can vastly change the feel of your work, with a serif font being much better for printed work. Your final thesis, for instance, will look a lot better with a serif font like Cambria or Garamond. It will also end up cheaper to print. (that was a joke)
Of course there's nothing stopping you using a fully customised Style Set to start with by selecting a document type from File > New.
References
As you will be aware by now, referencing is both the most important and the most irritating part of scientific writing. Fortunately, Word has a few tricks to make everything a lot simpler for you. We'll start with how to reference within a document.
Once you have instered an image, click it then go to the References Tab at the top of the Window. Then click on Insert Caption:

The Captions Menu is in the References Ribbon Tab
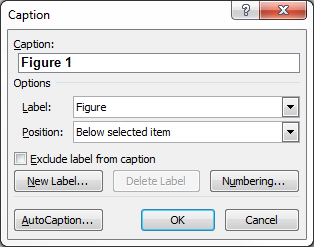
You can now add some text to your image caption. Now, when you are writing the rest of the document, if you want to reference this image you can click the Cross-Reference button in the Captions Menu and add the Figure. This text also shows up in the list of figures you are required to have at the front of your thesis.

This text will also be displayed in your List of Figures. The number updates automatically based on the location to other figures
You can also use this method to reference tables and equation.
To reference something outside the document, for example a research paper, there are a few methods. Firstly, the University would like you to try using EndNote. As I don't know much about it, I'll direct you toward the support page. What I do know is that it costs 72 quid to download which I personally think is criminal. No, what I highly recommend instead is Mendeley.
You can download a portable version from the Software section of my website, and I've made a more in-depth write-up of it here.
Images
- - If you want to preserve quality, or have a line drawing with blocky colours, save as a .png
- - If you have a more complicated image, a .jpg will be smaller but will be of lower quality
- There's a bit more information here in my "Image Tips" page
In order to stop your document ballooning in size you're going to want to keep the size of images to a reasonable level. A standard A4 page is 21 cm wide, thus your image should never be more than 21 cm wide. This doesn't include margins, however, so with Word's standard margins the actual width of a page in Word is 16 cm. The size is also related to the dots-per-inch or dpi. More dots = denser image = larger file size. 240 dpi is standard for printers, and above 350 dpi your eye can't make out the difference between individual dots.
Image anchors can stop your pictures moving around in the document when you type. You should attach the anchor to the text you want to keep stationary (a title or heading perhaps) and then any other text will flow around it. Microsoft help regarding image anchors.File Size
Keeping control of your image sizes is the easiest way to keep control of the overall file size. Make sure to not just copy images into Word, but save them in an /Images folder where you can always return to the original after making a _small version. As a rule, try not to let any image you are putting into Word be more than 1 mb large. A great way to edit your images down to a more reasonable size is to use the free online Photoshop-replacement: Pixlr.
If you are finding things getting really sluggish, you may want to think about splitting the document into sepeate sections- based on your chapters. Before you submit, make sure you change the page numbers so they run on from each other, and add together all the word counts from each section.